The experimental set-up
To demonstrate the fnctionality of the I²C bus, a digital temperature sensor of type LM75 will be connected to a JControl/SmartDisplay. To do this, merely the I²C signals SDA and SCL have to be connected, as well as VCC and GND for supplying the temperature sensor with power. The exact pin assignment of the JControl/SmartDisplay may be seen in the according data sheet.
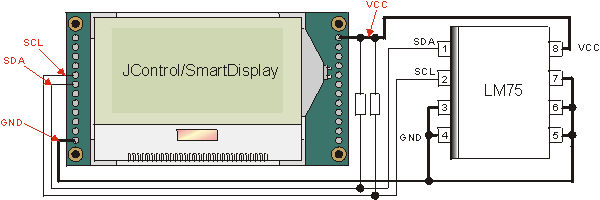
Figure 2: General schematic diagram
Hint: The circuit of the pins 5, 6 and 7 of the LM75 influence its I²C bus slave address. Further information in this matter can be found in the LM75 data sheet. In the discussed example those pins are tied to GND, which results in the slave address 0x90. Furthermore, a back-up capacitor (commonly 100nF) close to the I²C component is recommended in case of a long distance between the power supply and this component.
Attention: When external periphery is connected to the I²C bus, the signals SDA and SCL have to be tied to VCC via a pull-up resistor (commonly 27k Ohm). Thus it is ensured that a defined voltage level is present on the signal wires, even if no bus component is driving/accessing them (see figure 2).
The evaluation boards (e.g. of the JControl/SmartDisplay) already provide those pull-up resistors, so that the periphery (here the LM75) may be directly connected to the lead through I²C signals. Further information are found in the evaluation boards' datasheets.


 The experimental set-up


