The Integrated Development Environment JControl/IDE
|
II. Managing ProjectsThis chapter explains, how JControl projects can be created, saved, opened and modified using the JControl/IDE. Furthermore it is shown, how existing files can be added, how new files can be created within the project and how projects can be transferred from the PC to the JControl device and vice versa. |  |
Creating New Projects
There are several ways to create a new JControl project:
- By using the keyboard shortcut [Ctrl]+[N]
- By left-clicking the New button
 in the Icon Bar
- By opening the New menu and then selecting the menu item Project....
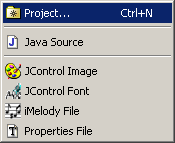
You can access this menu by using the main menu bar (Project->New), or by opening the context menu of the workspace area, or by clicking the small arrow beside the "New" icon in the Icon Bar.
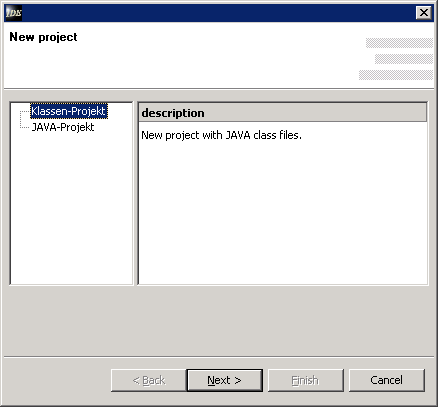
Following each of these actions, the project wizard appears, which displays a series of dialogs through which all project relevant settings can be changed. The first dialog (fig. 1) is used for specifying the project type. This property cannot be changed anymore after the project is created. There are two possible project types:
- The class project uses precompiled JAVA™ classes which have to be added separately after the creation of the project.
- The java project uses JAVA™ source code, which can be edited by using the integrated source code editor or external tools.
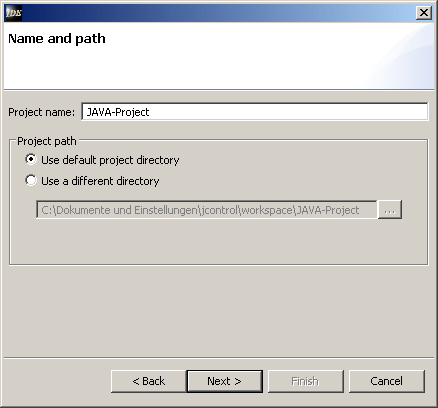
After selecting the desired project type, a click on the button Next leads to the second dialog (fig. 2). Here it is necessary to enter a project name as well as the project location, the directory where all the project's files will be stored. The preselected directory is located in the default project directory that can be changed in the global path settings dialog. If you would like to use a custom directory please select the corresponding checkbox. The project location is not changeable once the project has been created, but the project name can be modified any time.
After deciding the name and location of the project the button Next leads to the next dialog (fig. 3), where the JControl device to run the new project on can be selected (e.g. JControl/SmartDisplay). The button Auto-detection scans for connected JControl devices (those which are in download mode) and automatically selects the matching profile from the list. The target JControl device can be changed any time later on via the projects properties menu.
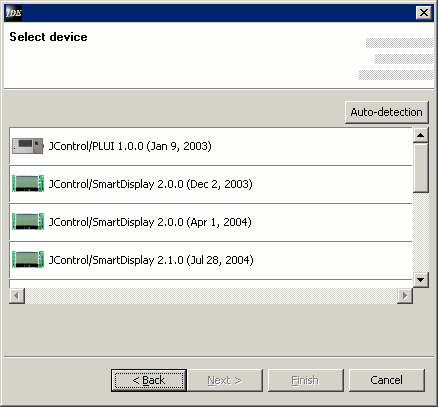
Note: If the automatic device detection fails, the reason could be that your version of the JControl/IDE doesn't support the device yet. In this case a current set of device profiles will solve the issue.
By clicking the button Finish the new project will be instantly created. Alternatively, the button Next leads to another dialog, which allows you to add additional libraries to your project (fig. 4).
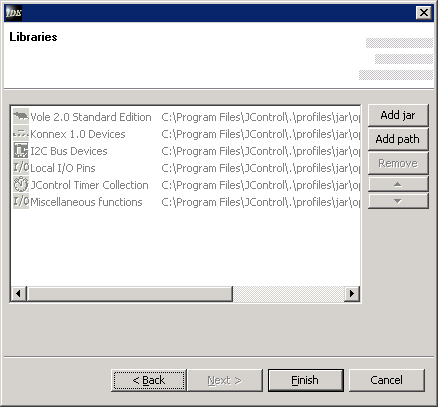
In this dialog a list of all JAVA™ libraries used in the project is displayed. The standard libraries offered by the target device are displayed in a light gray, which indicates that it is not possible to remove them. Additional application specific libraries in form of JAR archives or class folders can be added and removed.
Note: Application specific libraries can be added and removed any time after the creation of the project through its properties dialog.
Through the two arrow buttons at the right side of the dialog the order of the libraries can be changed. During the compilation, the listed libraries are linked in the displayed order (top to bottom) to the project. In case of duplicate classes, the ones linked first are used.
A click on the button Finish ends the wizard. The newly created project can be found under its name in the workspace.
Opening and Modifying Projects
There are four ways to open an existing project:
- by selecting the menu item "Open" in the Project menu (Project->Open),
- by clicking the icon
 in the icon bar,
- selecting the menu item "Open" in the context menu of the workspace (selectable using the right mouse button),
- by using the keyboard shortcut [Ctrl]+[O].
.jcp"). Following, the name of the opened project appears in the workspace.
To change a project's properties, there are two options. Both require the desired project to be selected in the workspace first. Then the properties dialog can be opened either by
- selecting the menu item "Properties" from the Project menu (Project->Properties),
- by selecting the menu item "Open" in the context menu of the workspace (selectable using the right mouse button).
The now opened dialog shows a list of the main property categories on the left side. This includes Info, Main class, Select device, and Libraries. By clicking on one of these categories, the corresponding properties will be displayed on the right side of the dialog.
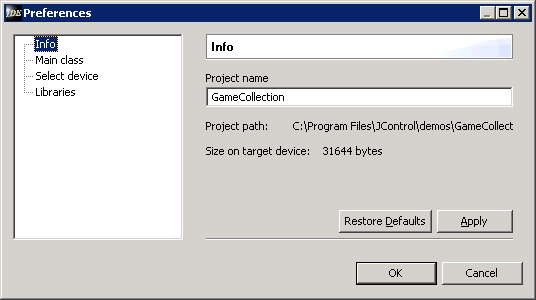
The category Info collects general project settings, such as the the project location, the project name and the projected size on the target device (fig. 5). The project name can be changed by the user. Changing the project name here will not modify the project's file name (cp. Rename)
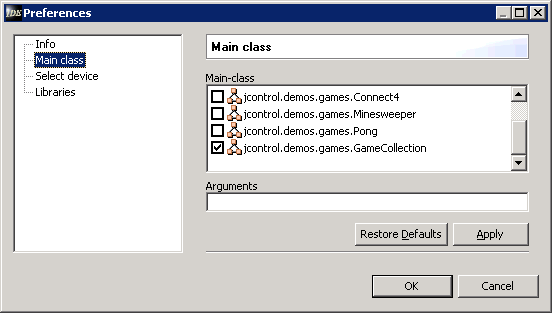
In the category Main class, the class to be executed on starting the simulator or the JControl device can be selected (fig. 6). This class requires a static main() method. Furthermore parameters for the main() method can be specified here.
NOTE: An alternative way to pick a main class is by selecting it in the navigation panel and choosing the menu item Main class from its context menu.
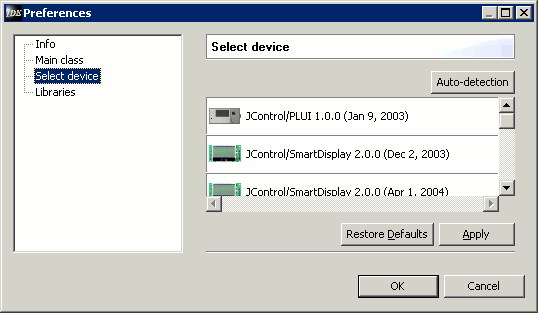
By picking category Select device (fig. 7) it is possible to choose the JControl device the project is targeting at. See Create New Projects for details.
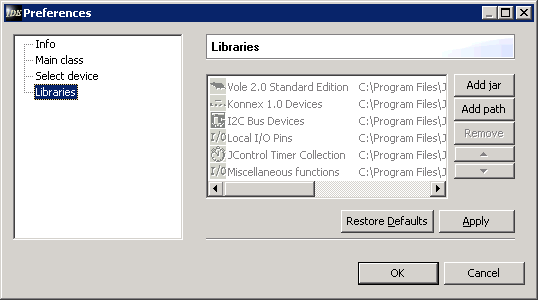
In category Libraries user libraries can be added to a project (fig. 8). See Create New Projects for details.
Creating New Files
Having created a new project, new files can be created and added. This is done via the New menu, already known from creating projects. A different way of creating files is the context menu of the navigation window that is opened by right-clicking the mouse. In the opening submenu, select the type of file you want to create.
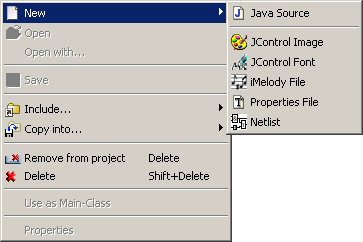
Figure 9 shows the available file types. Table 1 gives a textual summary of the file types:
| File type | Icon | Extension |
|---|---|---|
| Java file | | .java |
| Image | | .jcif |
| Font | | .jcfd |
| Melody | | .imy |
The content of the menu for creating new files is context sensitive an it even depends on the current project type. That is why the menu's behaviour can differ more or less from the way shown in this example.
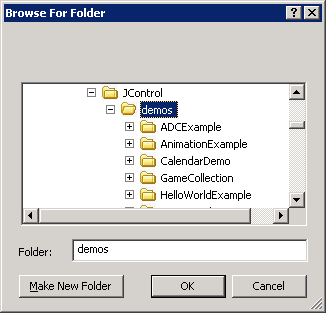
Once a file type is selected, a dialog appears that asks for the directory and the name of the new file. The button Change Path will open a file selector to browse for the directory where the new file should be created (fig. 10). A press on the button OK will create the new file which from now on will be displayed in the navigation window of the active project.
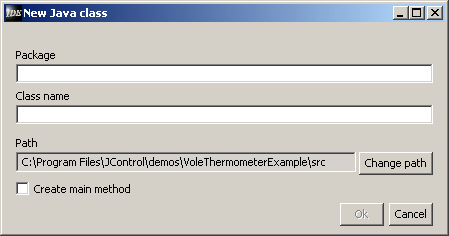
New Java files can automatically get a main method by selecting the Create main method option (fig. 11). Listing 1 shows the newly created JAVA™ source code.
| 1 | /** |
| 2 | * Java file created by JControl/IDE |
| 3 | * |
| 4 | * @author Author |
| 5 | * @date Date |
| 6 | * |
| 7 | */ |
| 8 | public class Test { |
| 9 | |
| 10 | public Test() { |
| 11 | // add your code here |
| 12 | } |
| 13 | |
| 14 | public static void main(String[] args) { |
| 15 | new Test(); |
| 16 | } |
| 17 | } |
Including Files and Directories
Since IDE version 3.3.0, is it possible to incluce source directories into projects. Thus, the entire content of a directory will be treated as a part of the project. The IDE accepts any files that are compatible with the current JControl device, even files that can be compiled into a corresponding file format. In most cases, the file types we are talking about are the same as those that can be created by the IDE. (see Creating files). That means, any existing meta files (e.g. CVS or SVN entries, thumbnails, ini-files etc.) will be ignored and not be uploaded to a device by mistake. If the content of source directories is changed by external programs the IDE recognizes the changes and consequently updates the project automatically.
As is earlier versions of the IDE it is still possible to include single files that are not a part of any source directory.
Wie das Erstellen neuer Dateien auch erfolgt das Einbinden von Verzeichnissen oder einzelner Dateien über das Kontextmenü des Navigations-Fensters.
Directories and files can be included through the Include menu item of the navigation window's context menu (fig. 12).
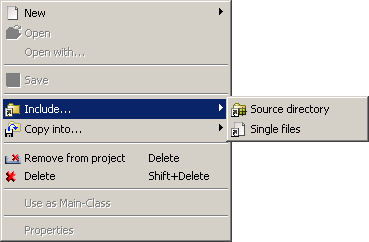
Note: Directories are processed recursively. That means that all subdirectories are scanned for files to add as well.
The JControl/IDE comes with some examples on how to access files that are stored inside a project. For example the usage of pictures and fonts is shown in ResourcesExample .
Copying Files Into a Project
The function Copying Files Into a Project is used to copy files from any location in the filesystem into a project source directory. In this case, resources will be copied directly into the selected root path, Java source files will - according to their package names - be copied into sub-directories, respectively.
This function is only available if the project contains at least one source directory. Read the chapter Including Files and Directories if you wonder how to to this. Select the directory you would like to use as target for the files to copy in the navigator panel. Open the Wählen Sie das gewünschte Verzeichnis im Navigations-Fensters und öffnen Sie das context menu. Select the menu item Copy into... and choose either Single File or Directory (fig. 13). In case of directories, all files including sub-directories are copied. The Copy into... option is only available in the source navigator.
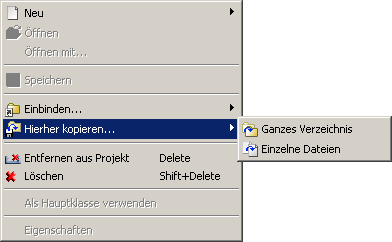
The file types that can be imported into a project by default are pictures, fonts and melodies (file extensions: ".jcif", ".jcfd", ".imy"). Depending on the type of project, either JAVA™ source code or class files can be imported as well.
Up- and Downloading Projects
A project can be executed on a real JControl module anytime. All one has to do is to upload the project to the device. This can be done by clicking on the upload button in the icon bar or by picking the menu item Transfer->Upload project. NOTE: The JControl module has to be connected to the PC and set to download mode.
The steps to go through to upload a project to a JControl module are:
- Saving the project
- If the project contains any unsaved changes, the user will be asked if the project should be saved.
- If the project contains any unsaved changes, the user will be asked if the project should be saved.
- Scanning ports for connected devices
- All connection ports enabled in Extras->Communication setup will be probed for connected JControl devices.
- All connection ports enabled in Extras->Communication setup will be probed for connected JControl devices.
- Selection of the memory bank (only for devices with more than one memory bank)
- In case a JControl module with more than one Flash memory bank is used, the user can choose the memory bank for uploading the project to. Using the program JControl/PropertyEdit or a selfwritten application the bank the JControl module boots from can be changed.
- In case a JControl module with more than one Flash memory bank is used, the user can choose the memory bank for uploading the project to. Using the program JControl/PropertyEdit or a selfwritten application the bank the JControl module boots from can be changed.
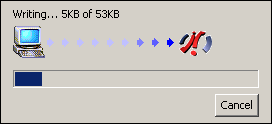
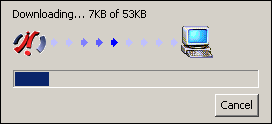
- Uploading the project
- A small window keeps displaying the current upload progress (fig. 14).
- A small window keeps displaying the current upload progress (fig. 14).
- Rebooting the JControl module
- After finishing the upload, the JControl module reboots automatically.
- After finishing the upload, the JControl module reboots automatically.
The project's JAVA™ byte code now is executed on the JControl device.
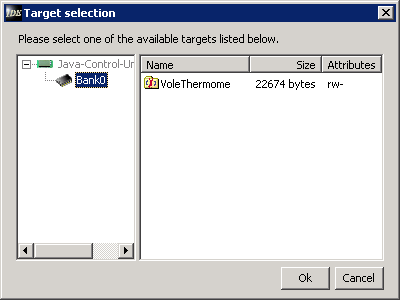
Downloading projects from the JControl device works in a similar manner as uploading projects. First the JControl module has to be set into download mode. With a click on the corresponding icon or menu item the download gets initiated. The user will be asked to select a memory bank to download the project from (fig. 15), then, the name and the location the downloaded project should be stored in must be specified (fig. 16). Finally the download starts and a window keeps displaying the progress (fig. 17).
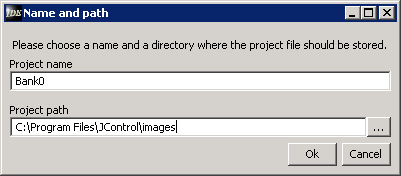
The downloaded project now is stored in the target directory as a binary image (extension: ".img"). Additionaly a matching JControl/IDE project file (extension: ".jcp") has been generated.