GUI programming using JControl/Vole
VII. Menus
With package jcontrol.ui.vole.menu, JControl/Vole provides an easy to use collection of graphical and text-based user menus. This chapter presents short program examples and elucidates the usage of the different kinds of menu types. In addition to this tutorial, the program example VoleMenuDemo is worth a look. It may be downloaded in the Examples & Demos http://www.jcontrol.org/examples/index_en.html section.
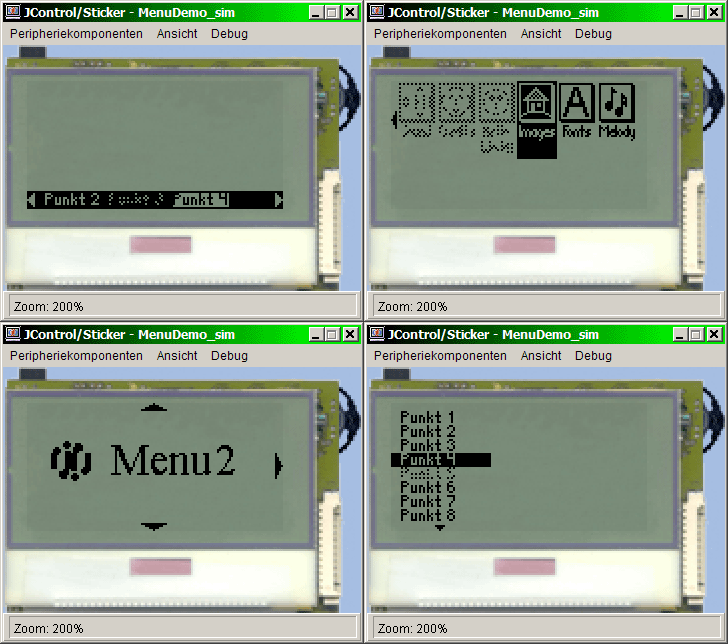
General
The MenuInterface
Even though the menus in the package jcontrol.ui.vole.menu are of very different graphical design, they don't differ too much in their usage by an application program. This is possible due to the common interface MenuInterface, which is implemented by every menu type and provides a set of "standard methods" for the programming of menus. Table 1 lists those methods and describes their functionality.
| Method | Description |
|---|---|
addMenuItem(String item) | Adds a new entry to a menu. The item depends on the menu type and may either be an entry for a textual menu or refer to an image resource. |
addMenuItem(String item, int pos) | Adds a new entry to a menu at the specified position. |
removeMenuItem(String item) | Removes an entry from a menu. |
enableMenuItem(String item, boolean onoff) | Specifies whether a menu entry can be chosen (enabled) or not (disabled; shows as grey/dotted entry). |
boolean isMenuItemEnabled(String item) | Returns whether the specified item is enabled or disabled. |
int getSelectedIndex() | Returns the index of the currently selected menu item. |
boolean select(int index) | Selects the menu item specified by index. Returns a boolean which indicates whether the selection has been successful or not. |
boolean select(String item) | Like select(int index), with the difference that the menu item to be selected is specified by a String. |
jcontrol.ui.vole.menu.MenuInterface
At first, to be able to use the methods listed above, a menu has to be instantiated. For this purpose, different menu types are available (according to the purpose of the application). These will be presented in the following sections by means of program examples.
Usage of menus
The class Frame of JControl/Vole is designed in a way, that only one menu can be active at a time. To activate a menu and therewith make it visible to the user, the methode Frame.setMenu(Menu m) has to be invoked. The menu will thereon be drawn on the display (possibly occluding other components) and gains the input focus. The user may now choose an entry (up, down, right, left) and select it by pressing the according pushbutton. The UI framework will then remove the menu automatically and trigger an ActionEvent.
Receiving ActionEvents
The are two possibilities to receive menu triggered ActionEvents. Either overwriting the method onActionEvent of the class Frame or adding an ActionListener to the menu by invoking setListener(ActionListener listener). The following source code examples make use of the first variant.
The overwriting method onActionListener of the class Frame should at first check, if a received ActionEvent has been triggered by a menu (and not, for instance, by a Button or other GUI component). The Java operator instanceof suits this purpose:
| if (event.getSource() instanceof Menu) { | |
| ... | |
| /* perform actions */ | |
| ... | |
| } |
Afterwards, the selected menu item can be identified by invoking Menu.getSelectedIndex().
MenuBar
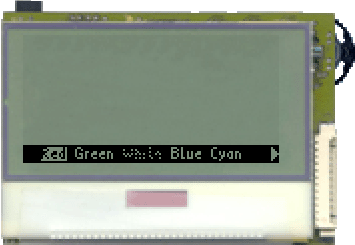
The MenuBar is a horizontal line with text-based entries and scroll capability. Due to its small dimensions, it is especially suited for application programs, in which the menu is intended be visible all the time. A special constructor parameter position allows the automatic alignment at the upper or lower edge of the screen (ALIGN_TOP and ALIGN_BOTTOM respectively). Individual fonts might be used by invoking the method setFont(Resource font).
The following program example VoleMenuBarExample creates a menu of the type MenuBar at the lower edge of the screen and draws it. To try the program, download the archive VoleMenuBarExample.zip http://www.jcontrol.org/examples/VoleMenuBarExample.zip and open the contained project file VoleMenuBarExample.jcp in your JControl/IDE.
| 1 | import jcontrol.ui.vole.Frame; |
| 2 | import jcontrol.ui.vole.menu.MenuBar; |
| 3 | |
| 4 | /** |
| 5 | * <p>This example demonstrates how to use the |
| 6 | * component MenuBar within the GUI framework |
| 7 | * JControl/Vole.</p> |
| 8 | * |
| 9 | * <p>(C) DOMOLOGIC Home Automation GmbH 2003-2005</p> |
| 10 | */ |
| 11 | public class VoleMenuBarExample extends Frame { |
| 12 | |
| 13 | /** |
| 14 | * Create and show a MenuBar. |
| 15 | */ |
| 16 | public VoleMenuBarExample() { |
| 17 | |
| 18 | // create the MenuBar |
| 19 | MenuBar menu = new MenuBar(0, 0, 128, 64, MenuBar.ALIGN_BOTTOM); |
| 20 | |
| 21 | // add some menu items |
| 22 | menu.addMenuItem("Red"); |
| 23 | menu.addMenuItem("Green"); |
| 24 | menu.addMenuItem("White"); |
| 25 | menu.addMenuItem("Blue"); |
| 26 | menu.addMenuItem("Cyan"); |
| 27 | menu.addMenuItem("Black"); |
| 28 | menu.addMenuItem("Gray"); |
| 29 | menu.addMenuItem("Orange"); |
| 30 | |
| 31 | // add the menu bar to the Frame |
| 32 | this.setMenu(menu); |
| 33 | |
| 34 | // disable a menu item |
| 35 | menu.enableMenuItem("White", false); |
| 36 | |
| 37 | // show the frame |
| 38 | setVisible(true); |
| 39 | } |
| 40 | |
| 41 | /** |
| 42 | * Instantiate the VoleMenuBarExample |
| 43 | */ |
| 44 | public static void main(String[] args) { |
| 45 | new VoleMenuBarExample(); |
| 46 | } |
| 47 | } |
TextMenu
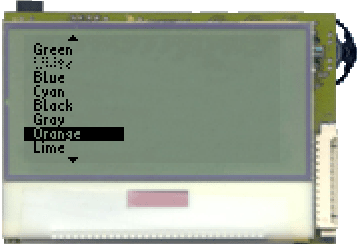
The TextMenu is a simple list of text entries with scroll capability. The menu items are displayed left-aligned and one below the other within the scope of the menus' area. Dimensions and position of the TextMenu are to be passed to the constructor. If the menu consists of more entries than can be shown at the same time, arrows at the upper and lower edge of the menu will indicate the enabled scroll functionality. The currently selected menu item will be marked by inverting this entry.
The following source code example scarcely differs from the one in section MenuBar, merely the MenuBar has been replaced by a TextMenu and some constructor parameters have been changed. Figure 3 shows a screenshot of the VoleTextMenuExample.
| 1 | import jcontrol.ui.vole.Frame; |
| 2 | import jcontrol.ui.vole.menu.TextMenu; |
| 3 | |
| 4 | /** |
| 5 | * <p>This example demonstrates how to use the |
| 6 | * component TextMenu within the GUI framework |
| 7 | * JControl/Vole.</p> |
| 8 | * |
| 9 | * <p>(C) DOMOLOGIC Home Automation GmbH 2003-2005</p> |
| 10 | */ |
| 11 | public class VoleTextMenuExample extends Frame { |
| 12 | |
| 13 | /** |
| 14 | * Create and show a TextMenu. |
| 15 | */ |
| 16 | public VoleTextMenuExample() { |
| 17 | |
| 18 | // create the MenuBar |
| 19 | TextMenu menu = new TextMenu(0, 0, 50, 64); |
| 20 | |
| 21 | // add some menu items |
| 22 | menu.addMenuItem("Red"); |
| 23 | menu.addMenuItem("Green"); |
| 24 | menu.addMenuItem("White"); |
| 25 | menu.addMenuItem("Blue"); |
| 26 | menu.addMenuItem("Cyan"); |
| 27 | menu.addMenuItem("Black"); |
| 28 | menu.addMenuItem("Gray"); |
| 29 | menu.addMenuItem("Orange"); |
| 30 | menu.addMenuItem("Lime"); |
| 31 | menu.addMenuItem("Yellow"); |
| 32 | menu.addMenuItem("Brown"); |
| 33 | |
| 34 | // add the menu bar to the Frame |
| 35 | this.setMenu(menu); |
| 36 | |
| 37 | // disable a menu item |
| 38 | menu.enableMenuItem("White", false); |
| 39 | |
| 40 | // show the frame |
| 41 | setVisible(true); |
| 42 | } |
| 43 | |
| 44 | /** |
| 45 | * Instantiate the VoleMenuBarExample |
| 46 | */ |
| 47 | public static void main(String[] args) { |
| 48 | new VoleTextMenuExample(); |
| 49 | } |
| 50 | } |
BigImageMenu
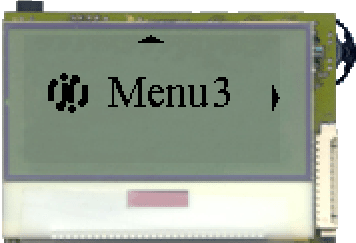
If an application program shall be equipped with a striking and intuitive image menu, the class BigImageMenu is the one to choose. This menu is optimised for menu items that fill the entire screen. Arrows at the upper and lower edge of the screen indicate further menu items. The arrow at the right edge of the screen refers to the submenu represented by the current menu item. Due to its huge (graphical) need of space, the BigImageMenu suits as an attractive main menu of an application. The submenus may be realised as MultiImageMenu or TextMenu.
Some images were drawn for the consequtively listed program example VoleBigImageMenuExample, using the JControl/IDE tool PictureEdit. Those are included in the archive VoleBigImageMenuExample.zip http://www.jcontrol.org/examples/VoleBigImageMenuExample.zip along with the program and a JControl/IDE project file. The latter can be opened in your JControl/IDE and tested by using the simulator or your JControl device.
| 1 | import jcontrol.ui.vole.Frame; |
| 2 | import jcontrol.ui.vole.menu.BigImageMenu; |
| 3 | |
| 4 | /** |
| 5 | * <p>This example demonstrates how to use the |
| 6 | * component BigImageMenu within the GUI framework |
| 7 | * JControl/Vole.</p> |
| 8 | * |
| 9 | * <p>(C) DOMOLOGIC Home Automation GmbH 2003-2005</p> |
| 10 | */ |
| 11 | public class VoleBigImageMenuExample extends Frame { |
| 12 | |
| 13 | /** |
| 14 | * Create and show a BigImageMenu |
| 15 | */ |
| 16 | public VoleBigImageMenuExample() { |
| 17 | |
| 18 | // create a big BigImageMenu |
| 19 | BigImageMenu menu = new BigImageMenu(0, 0, 128, 64); |
| 20 | |
| 21 | // add some menu items |
| 22 | menu.addMenuItem("menu1.jcif"); |
| 23 | menu.addMenuItem("menu2.jcif"); |
| 24 | menu.addMenuItem("menu3.jcif"); |
| 25 | |
| 26 | // show the menu |
| 27 | setMenu(menu); |
| 28 | show(); |
| 29 | } |
| 30 | |
| 31 | /** |
| 32 | * Instantiate the VoleBigImageMenuExample |
| 33 | */ |
| 34 | public static void main(String[] args) { |
| 35 | new VoleBigImageMenuExample(); |
| 36 | } |
| 37 | } |
MultiImageMenu
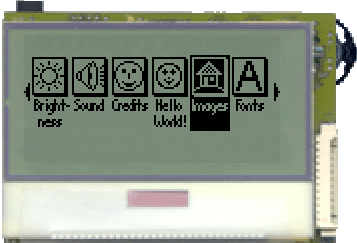
The MultiImageMenu works just like the BigImageMenu with images as menu items. Admittedly the icons of the MultiImageMenu are horizontally aligned, so that multiple menu items can be shown at the same time. The MultiImageMenu also supports scrolling if not all menu items can be shown at one time. The currently selected item is drawn color-inverted. The desired amount of concurrently displayed menu items has to be given to the constructor. The available size per image will than be calculated and the according icons will be clipped of their dimensions exceeds the calculated size. For an accommodating appearance, icons of the same size are recommended.
The following source code example demonstrates the usage of the MultiImageMenu. Like all other menus, this one also requires just a few lines of code to achieve a graphically appealing solution. Figure 5 shows the MultiImageMenu in action. Like every other example in this tutorial, this one can also be downloaded as an archive. VoleMultiImageMenuExample.zip http://www.jcontrol.org/examples/VoleMultiImageMenuExample.zip contains the according source code, images and a JControl/IDE project file.
| 1 | import jcontrol.ui.vole.Frame; |
| 2 | import jcontrol.ui.vole.menu.MultiImageMenu; |
| 3 | |
| 4 | /** |
| 5 | * <p>This example demonstrates how to use the |
| 6 | * component MultiImageMenu within the GUI framework |
| 7 | * JControl/Vole.</p> |
| 8 | * |
| 9 | * <p>(C) DOMOLOGIC Home Automation GmbH 2003-2005</p> |
| 10 | */ |
| 11 | public class VoleMultiImageMenuExample extends Frame { |
| 12 | |
| 13 | /** |
| 14 | * Create and show a BigImageMenu |
| 15 | */ |
| 16 | public VoleMultiImageMenuExample() { |
| 17 | |
| 18 | // create a big BigImageMenu |
| 19 | MultiImageMenu menu = new MultiImageMenu(0, 10, 128, 38, 6); |
| 20 | |
| 21 | // add some menu items |
| 22 | menu.addMenuItem("menuimage1.jcif"); |
| 23 | menu.addMenuItem("menuimage2.jcif"); |
| 24 | menu.addMenuItem("menuimage3.jcif"); |
| 25 | menu.addMenuItem("menuimage4.jcif"); |
| 26 | menu.addMenuItem("menuimage5.jcif"); |
| 27 | menu.addMenuItem("menuimage6.jcif"); |
| 28 | menu.addMenuItem("menuimage7.jcif"); |
| 29 | menu.addMenuItem("menuimage8.jcif"); |
| 30 | menu.addMenuItem("menuimage9.jcif"); |
| 31 | |
| 32 | // show the menu |
| 33 | setMenu(menu); |
| 34 | show(); |
| 35 | } |
| 36 | |
| 37 | /** |
| 38 | * Instantiate the VoleBigImageMenuExample |
| 39 | */ |
| 40 | public static void main(String[] args) { |
| 41 | new VoleMultiImageMenuExample(); |
| 42 | } |
| 43 | } |