GUI programming using JControl/Vole
V. Measuring Instruments
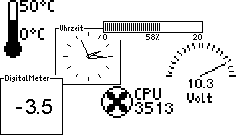
JControl/Vole provides within package jcontrol.ui.vole.meter many different gauges with manifold options for configuration. This chapter will introduce these components and demonstrate their usage by means of program examples.
 |
AnalogMeterThe GUI component |
| Method | Description |
|---|---|
AnalogMeter(int x, int y, int width, int height, int min, int max, int openAngle, int orientation, int dials) | Creates a new AnalogMeter at the specified coordinates. The parameters min and max specify the range of values, dials represents the amount of scale lines. openAngle is the desired maximal hand deflection and orientation adjusts the gauges' orientation (possible values are ORIENTATION_CENTER, ORIENTATION_LEFT and ORIENTATION_RIGHT). If orientation equals ORIENTATION_LEFT or ORIENTATION_RIGHT, the maximal hand deflection (openAngle) is limited to 90°. |
setCaption(String captionMin, String captionMax) | Adds a caption to the AnalogMeter. The passed Strings will be displayed at the beginning and at the end of the scale. |
setNumericDisplay(int digits, int decimals, String unit) | This method configures the alphanumeric display of measured values. Parameter digits defines the total number of displayed digits, decimals specifies the number of decimals included in digits. Example: digits=4 and decimals=3 will display values in form of x,xxx. If decimals=0, no decimal point will be displayed (useful if the measured value shall be displayed in a different range of values). The parameter unit holds the unit of the displayed values (e.g. "V"). |
setValue(int value) | Passes a new value to the AnalogMeter, which thereupon will be updated. If value exceeds the range of values, it will be replaced by the according value for min or max. |
jcontrol.ui.vole.meter.AnalogMeter
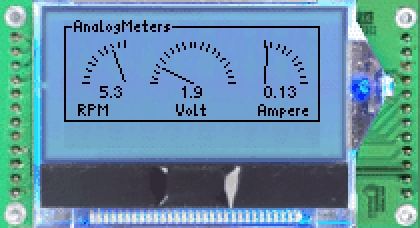
The program example VoleAnalogMeterExample listed below demonstrates the usage of the AnalogMeter and some of its methods listed in table 1. It is included in the ZIP archive VoleAnalogMeterExample.zip http://www.jcontrol.org/examples/VoleAnalogMeterExample.zip along with the homonymous JControl/IDE project file. Use the simulator or your JControl device to see the program running.
| 1 | import jcontrol.lang.Math; |
| 2 | import jcontrol.lang.ThreadExt; |
| 3 | import jcontrol.ui.vole.Border; |
| 4 | import jcontrol.ui.vole.Container; |
| 5 | import jcontrol.ui.vole.Frame; |
| 6 | import jcontrol.ui.vole.Label; |
| 7 | import jcontrol.ui.vole.meter.AnalogMeter; |
| 8 | |
| 9 | /** |
| 10 | * <p>This example demonstrates how to use the |
| 11 | * component AnalogMeter within the GUI framework |
| 12 | * JControl/Vole.</p> |
| 13 | * |
| 14 | * <p>(C) DOMOLOGIC Home Automation GmbH 2003-2005</p> |
| 15 | */ |
| 16 | public class VoleAnalogMeterExample extends Frame { |
| 17 | AnalogMeter am1, am2, am3; |
| 18 | |
| 19 | /** |
| 20 | * Create three AnalogMeters with different configurations. |
| 21 | */ |
| 22 | public VoleAnalogMeterExample() { |
| 23 | Container container = new Container(); |
| 24 | jcontrol.io.Backlight.setBrightness(255); |
| 25 | // create the first AnalogMeter |
| 26 | am1 = new AnalogMeter(0, 10, 30, 30, 0, 70, 90, |
| 27 | AnalogMeter.ORIENTATION_LEFT, 10); |
| 28 | am1.setNumericDisplay(4, 1, null); |
| 29 | |
| 30 | container.add(am1); |
| 31 | container.add(new Label("RPM", 0, 42, 30, 10, |
| 32 | Label.ALIGN_CENTER)); |
| 33 | |
| 34 | // create the second AnalogMeter |
| 35 | am2 = new AnalogMeter(35, 10, 58, 30, 0, 120, 180, |
| 36 | AnalogMeter.ORIENTATION_CENTER, 20); |
| 37 | am2.setNumericDisplay(4, 1, null); |
| 38 | |
| 39 | container.add(am2); |
| 40 | container.add(new Label("Volt", 35, 42, 58, 10, |
| 41 | Label.ALIGN_CENTER)); |
| 42 | |
| 43 | // create the third AnalogMeter |
| 44 | am3 = new AnalogMeter(100, 10, 30, 30, 0, 200, 90, |
| 45 | AnalogMeter.ORIENTATION_RIGHT, 10); |
| 46 | am3.setNumericDisplay(4, 2, null); |
| 47 | |
| 48 | container.add(am3); |
| 49 | container.add(new Label("Ampere", 95, 42, 30, 10, |
| 50 | Label.ALIGN_CENTER)); |
| 51 | |
| 52 | // add a border |
| 53 | container.add(new Border("AnalogMeters", 0, 0, 128, 51)); |
| 54 | |
| 55 | // add the container to the frame |
| 56 | this.add(container); |
| 57 | |
| 58 | // make us visible |
| 59 | show(); |
| 60 | |
| 61 | |
| 62 | // create some random values |
| 63 | for (;;) { |
| 64 | am1.setValue(Math.rnd(70)); |
| 65 | am2.setValue(Math.rnd(120)); |
| 66 | am3.setValue(Math.rnd(200)); |
| 67 | |
| 68 | try { |
| 69 | ThreadExt.sleep(1000); |
| 70 | } catch (InterruptedException e) {} |
| 71 | } |
| 72 | } |
| 73 | |
| 74 | // Instantiate and show the VoleAnalogMeterExample |
| 75 | public static void main(String[] args) { |
| 76 | new VoleAnalogMeterExample(); |
| 77 | } |
| 78 | } |
 |
DigitalMeter and SevenSegmentMeterThe two GUI components |
The SevenSegmentMeter is -- except for a certain minimal size -- freely scaleable. The size of the DigitalMeter depends on the used Font (method setFont(Resource font)). Besides the constructors, the only major used methode is setValue(int value), which passes the new value to be displayed to the component (see table 2).
| Method | Description |
|---|---|
DigitalMeter(int x, int y, int digits, int decimals) | Creates a new DigitalMeter at the given coordinates. Parameter digits defines total number of displayed digits, decimals specifies the number of decimals included in digits. Example: digits=4 and decimals=3 will display values in form of x,xxx. The components' dimensions result from the used Font (method setFont(Resource font)) and the specified number of digits. |
SevenSegmentMeter(int x, int y, int width, int height, int digits, int decimals) | Creates a new SevenSegmentMeter at the given coordinates. width and height specify the components' size and therefore the size of the displayed digits. Parameter digits defines total number of displayed digits, decimals specifies the number of decimals included in digits. Example: digits=4 and decimals=3 will display values in form of x,xxx. |
setValue(int value) | Passes a new value to the SevenSegmentMeter and DigitalMeter respectively, which thereupon will be updated. |
jcontrol.ui.vole.meter.SevenSegmentMeter and DigitalMeter
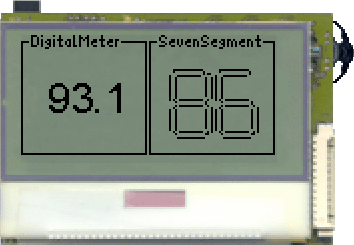
The screenshot shown in figure 2 shows the program example VoleDigitalMeterExample whose source code is shown in listing 2. It displays both a DigitalMeter and a SevenSegmentMeter on any JControl device with a lcd or in the simulator of the JControl/IDE.
| 1 | import java.io.IOException; |
| 2 | |
| 3 | import jcontrol.io.Resource; |
| 4 | import jcontrol.lang.Math; |
| 5 | import jcontrol.lang.ThreadExt; |
| 6 | import jcontrol.ui.vole.Border; |
| 7 | import jcontrol.ui.vole.Frame; |
| 8 | import jcontrol.ui.vole.meter.DigitalMeter; |
| 9 | import jcontrol.ui.vole.meter.SevenSegmentMeter; |
| 10 | |
| 11 | /** |
| 12 | * <p>This example demonstrates how to use the |
| 13 | * component DigitalMeter within the GUI framework |
| 14 | * JControl/Vole. |
| 15 | * This example needs the font resource |
| 16 | * "arial24.jcfd".</p> |
| 17 | * |
| 18 | * <p>(C) DOMOLOGIC Home Automation GmbH 2003-2005</p> |
| 19 | */ |
| 20 | public class VoleDigitalMeterExample extends Frame { |
| 21 | |
| 22 | public VoleDigitalMeterExample() { |
| 23 | // create the DigitalMeter |
| 24 | DigitalMeter dm = new DigitalMeter(13, 20, 3, 1); |
| 25 | |
| 26 | // set the Font of the DigitalMeter |
| 27 | try { |
| 28 | dm.setFont(new Resource("arial24.jcfd")); |
| 29 | } catch (IOException e) {} |
| 30 | |
| 31 | // add the DigitalMeter to the Frame |
| 32 | this.add(dm); |
| 33 | |
| 34 | // create the LCDMeter |
| 35 | SevenSegmentMeter sm = new SevenSegmentMeter(70, 10, 50, |
| 36 | 50, 2, 0); |
| 37 | this.add(sm); |
| 38 | |
| 39 | // make some pretty borders |
| 40 | this.add(new Border("DigitalMeter", 0, 0, 63, 60)); |
| 41 | this.add(new Border("SevenSegment", 64, 0, 63, 60)); |
| 42 | |
| 43 | // make the frame visible |
| 44 | show(); |
| 45 | |
| 46 | |
| 47 | // produce some random values |
| 48 | for (;;) { |
| 49 | dm.setValue(Math.rnd(2000)-1000); |
| 50 | sm.setValue(Math.rnd(150)-50); |
| 51 | try{ ThreadExt.sleep(1000); }catch(InterruptedException e){} |
| 52 | } |
| 53 | } |
| 54 | |
| 55 | // start the demonstration |
| 56 | public static void main(String[] args) { |
| 57 | new VoleDigitalMeterExample(); |
| 58 | } |
| 59 | } |
 |
BarMeterThe |
Besides the standard methods like setValue or setBounds, the BarMeter provides some specific configuration options. These are listed in table 3.
| Method | Description |
|---|---|
BarMeter(int x, int y, int width, int height, int min, int max, boolean orientation, int style) | Creates a new BarMeter at the desired location and with the specified dimensions. The values min and max define the range of values to be displayed. The parameter style specifies the used texture(FILL_LINE or FILL_SOLID). orientation configures the BarMeters' alignment (possible values are ORIENTATION_HORIZONTAL and ORIENTATION_VERTICAL). |
setCaption(String captionMin, String captionMax) | Adds a caption to the BarMeter. The passed Strings will be displayed at the beginning and at the end of the bar. |
setNumericDisplay(int digits, int decimals, String unit) | This method configures the alphanumeric display of measured values. Parameter digits defines the total number of displayed digits, decimals specifies the number of decimals included in digits. Example: digits=4 and decimals=3 will display values in form of x,xxx. If decimals=0, no decimal point will be displayed (useful if the measured value shall be displayed in a different range of values). The parameter unit holds the unit of the displayed values (e.g. "V"). |
setValue(int value) | Passes a new value to the BarMeter, which thereupon will be updated. If value exceeds the range of values, it will be replaced by the according value for min or max. |
jcontrol.ui.vole.meter.BarMeter
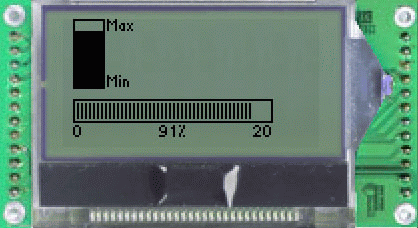
The following program listing 3 is called VoleBarMeterExample and demonstrates the usage of the BarMeter. You may download the archive VoleBarMeterExample.zip http://www.jcontrol.org/examples/VoleBarMeterExample.zip and open the contained JControl/IDE project file. If you start the project in the simulator you will get a picture like the one shown in figure 3.
| 1 | import jcontrol.lang.Math; |
| 2 | import jcontrol.lang.ThreadExt; |
| 3 | import jcontrol.ui.vole.Frame; |
| 4 | import jcontrol.ui.vole.meter.BarMeter; |
| 5 | |
| 6 | /** |
| 7 | * <p>This example demonstrates how to use the |
| 8 | * components BarMeter and Thermometer within |
| 9 | * the GUI framework JControl/Vole.</p> |
| 10 | * |
| 11 | * <p>(C) DOMOLOGIC Home Automation GmbH 2003-2005</p> |
| 12 | */ |
| 13 | public class VoleBarMeterExample extends Frame { |
| 14 | |
| 15 | /** |
| 16 | * Draw two BarMeters and a Thermometer |
| 17 | */ |
| 18 | public VoleBarMeterExample() { |
| 19 | // create a vertical BarMeter with solid fill and inscriptions |
| 20 | BarMeter bm1 = new BarMeter(5, 0, 30, 35, 0, 20, |
| 21 | BarMeter.ORIENTATION_VERTICAL, |
| 22 | BarMeter.FILL_SOLID); |
| 23 | bm1.setCaption("Min", "Max"); |
| 24 | this.add(bm1); |
| 25 | |
| 26 | // create a horizontal BarMeter with line-style fill |
| 27 | BarMeter bm2 = new BarMeter(5, 40, 100, 20, 0, 100, |
| 28 | BarMeter.ORIENTATION_HORIZONTAL, |
| 29 | BarMeter.FILL_LINE); |
| 30 | bm2.setCaption("0", "20"); |
| 31 | bm2.setNumericDisplay(5, 0, "%"); |
| 32 | this.add(bm2); |
| 33 | |
| 34 | // make the frame visible |
| 35 | show(); |
| 36 | |
| 37 | // generate random values |
| 38 | for (;;) { |
| 39 | bm1.setValue(Math.rnd(20)); |
| 40 | bm2.setValue(Math.rnd(100)); |
| 41 | |
| 42 | try { ThreadExt.sleep(1000); } catch (InterruptedException e) {} |
| 43 | } |
| 44 | } |
| 45 | |
| 46 | /** |
| 47 | * Start the example |
| 48 | */ |
| 49 | public static void main(String[] args) { |
| 50 | new VoleBarMeterExample(); |
| 51 | } |
| 52 | } |
 |
ThermometerThe |
Besides the standard methods like setValue or setBounds, the Thermometer provides some specific configuration options. Those are listed in table 4.
| Method | Description |
|---|---|
Thermometer(int x, int y, int width, int height, int min, int max) | Creates a new Thermometer at the given position and of the specified size. The parameters min and max define the range of values. |
setCaption(String captionMin, String captionMax) | Adds a caption to the Thermometer. The passed Strings will be displayed at the top right (captionMax) and bottom right (captionMin) of this component. |
setNumericDisplay(int digits, int decimals, String unit) | This method configures the alphanumeric display of measured values. Parameter digits defines the total number of displayed digits, decimals specifies the number of decimals included in digits. Example: digits=4 and decimals=3 will display values in form of x,xxx. If decimals=0, no decimal point will be displayed (useful if the measured value shall be displayed in a different range of values). The parameter unit holds the unit of the displayed values (e.g. "V"). |
setValue(int value) | Passes a new value to the Thermometer, which thereupon will be updated. If value exceeds the range of values, it will be replaced by the according value for min or max. |
jcontrol.ui.vole.meter.Thermometer
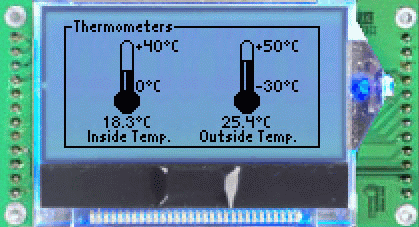
The following listing 4 shows the program example VoleThermometerExample. It can be downloaded as the ZIP archive VoleBarMeterExample.zip http://www.jcontrol.org/examples/VoleThermometerExample.zip, which contains the source code along with a JControl/IDE project file. This can be opened in the JControl/IDE and started by using the integrated simulator. Figure 4 shows a screenshot of the running program.
| 1 | import jcontrol.lang.Math; |
| 2 | import jcontrol.lang.ThreadExt; |
| 3 | import jcontrol.ui.vole.Border; |
| 4 | import jcontrol.ui.vole.Container; |
| 5 | import jcontrol.ui.vole.Frame; |
| 6 | import jcontrol.ui.vole.Label; |
| 7 | import jcontrol.ui.vole.meter.Thermometer; |
| 8 | |
| 9 | /** |
| 10 | * <p>This example demonstrates how to use the |
| 11 | * component Thermometer within the GUI framework |
| 12 | * JControl/Vole.</p> |
| 13 | * |
| 14 | * <p>(C) DOMOLOGIC Home Automation GmbH 2003-2005</p> |
| 15 | */ |
| 16 | public class VoleThermometerExample extends Frame { |
| 17 | Thermometer tm1, tm2; |
| 18 | |
| 19 | /** |
| 20 | * Create three AnalogMeters with different configurations. |
| 21 | */ |
| 22 | public VoleThermometerExample() { |
| 23 | Container container = new Container(); |
| 24 | jcontrol.io.Backlight.setBrightness(255); |
| 25 | |
| 26 | // create the first Thermometer |
| 27 | // |
| 28 | // NOTE: The String "\u00b0" hereby represents the |
| 29 | // UTF8 version of the 'degree' character |
| 30 | tm1 = new Thermometer(8, 10, 50, 45, 0, 400); |
| 31 | tm1.setNumericDisplay(5, 1, "\u00b0C"); |
| 32 | tm1.setCaption("0\u00b0C", "+40\u00b0C"); |
| 33 | |
| 34 | container.add(tm1); |
| 35 | container.add(new Label("Inside Temp.", 8, 55, 50, 8, |
| 36 | Label.ALIGN_CENTER)); |
| 37 | |
| 38 | // create the second Thermometer |
| 39 | // |
| 40 | // NOTE: The String "\u00b0" hereby represents the |
| 41 | // UTF8 version of the 'degree' character |
| 42 | tm2 = new Thermometer(68, 10, 50, 45, -300, 500); |
| 43 | tm2.setNumericDisplay(5, 1, "\u00b0C"); |
| 44 | tm2.setCaption("-30\u00b0C", "+50\u00b0C"); |
| 45 | |
| 46 | container.add(tm2); |
| 47 | container.add(new Label("Outside Temp.", 68, 55, 50, 8, |
| 48 | Label.ALIGN_CENTER)); |
| 49 | |
| 50 | // add a border |
| 51 | container.add(new Border("Thermometers", 0, 0, 128, 64)); |
| 52 | |
| 53 | // add the container to the frame |
| 54 | this.add(container); |
| 55 | |
| 56 | // make us visible |
| 57 | show(); |
| 58 | |
| 59 | // create some random values |
| 60 | for (;;) { |
| 61 | tm1.setValue(Math.rnd(400)); |
| 62 | tm2.setValue(Math.rnd(800)-300); |
| 63 | |
| 64 | try { |
| 65 | ThreadExt.sleep(1000); |
| 66 | } catch (InterruptedException e) {} |
| 67 | } |
| 68 | } |
| 69 | |
| 70 | // Instantiate and show the VoleAnalogMeterExample |
| 71 | public static void main(String[] args) { |
| 72 | new VoleThermometerExample(); |
| 73 | } |
| 74 | } |
Annotation: The string "\u00b0C" in line 42 represents "°C". The sequence "\u00b0" stands for the hexadecimal UTF-8 version of the character "°". This is used, because some editors modify this character when saving a file and it may thereupon not be displayed correctly anymore.
 |
AnalogClock
|
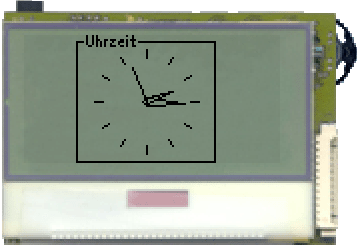
Figure 5 shows a screenshot of the JControl application VoleAnalogClockExample. Its source code is listet below. The program example demonstrates the commands to instantiate an AnalogClock und shows how the time can be updated by a simple continuous loop.
| 1 | import jcontrol.lang.ThreadExt; |
| 2 | import jcontrol.system.Time; |
| 3 | import jcontrol.ui.vole.Border; |
| 4 | import jcontrol.ui.vole.Frame; |
| 5 | import jcontrol.ui.vole.meter.AnalogClock; |
| 6 | |
| 7 | /** |
| 8 | * <p>This example demonstrates how to use the |
| 9 | * component AnalogClock within the GUI framework |
| 10 | * JControl/Vole.</p> |
| 11 | * |
| 12 | * <p>(C) DOMOLOGIC Home Automation GmbH 2003-2005</p> |
| 13 | */ |
| 14 | public class VoleAnalogClockExample extends Frame { |
| 15 | |
| 16 | /** |
| 17 | * Create and continuosly update an AnalogClock |
| 18 | */ |
| 19 | public VoleAnalogClockExample() { |
| 20 | // create a new AnalogClock |
| 21 | AnalogClock ac = new AnalogClock(35, 7, 26, true); |
| 22 | this.add(ac); |
| 23 | |
| 24 | // add a border |
| 25 | this.add(new Border("Analog Clock", 26, 0, 70, 64)); |
| 26 | |
| 27 | // make us visible |
| 28 | show(); |
| 29 | |
| 30 | // update the AnalogClock's time once a second |
| 31 | for (;;) { |
| 32 | Time t = new Time(); |
| 33 | ac.setValue(t.hour, t.minute, t.second); |
| 34 | try { |
| 35 | ThreadExt.sleep(1000); |
| 36 | } catch (InterruptedException e) {} |
| 37 | } |
| 38 | } |
| 39 | |
| 40 | /** |
| 41 | * Instantiate the example |
| 42 | */ |
| 43 | public static void main(String[] args) { |
| 44 | new VoleAnalogClockExample(); |
| 45 | } |
| 46 | } |
 |
FanMeterThe GUI componente |
The FanMeter is equipped with a display for decimal values and may receive an additional caption. Table 6 lists the accordingly available methods. The fans animation only starts, if the displayed value is greater than 0.
| Method | Description |
|---|---|
FanMeter(int x, int y) | Instantiates a new FanMeter at the specified position. |
animate() | Animates the fans blades for the impression of a spinning fan. This methode can be invoked by an application, but should normally be left in control of an AnimationContainer. |
setCaption(String caption) | Provides the FanMeter with a caption, which will be displayed on the rigth side of the fan image. |
setNumericDisplay(int digits, int decimals, String unit) | This method configures the alphanumeric display of measured values. Parameter digits defines the total number of displayed digits, decimals specifies the number of decimals included in digits. Example: digits=4 and decimals=3 will display values in form of x,xxx. If decimals=0, no decimal point will be displayed (useful if the measured value shall be displayed in a different range of values). The parameter unit holds the unit of the displayed values (e.g. "RPM"). |
setValue(int value) | Passes a new value to the FanMeter, which thereupon will be updated. |
jcontrol.ui.vole.meter.FanMeter
The program example listed below demonstrates the usage of the GUI component FanMeter in connection with an AnimationContainer. Thh latter only differs in few points from a normal Container, automatically recognises animateable GUI componentes and creates a process, which continuously invokes their method animate, after those components are added to the AnimationContainer. The programmer is provided with two additional methods by the class AnimationContainer:
| Method | Description |
|---|---|
setAnimation(boolean animate) | This method is used to (de)activate the animation of the animateable GUI components, contained in the AnimationContainer. |
setAnimationInterval(int interval) | Adjusts the speed of the animation. The time span between two steps of animation is givenby interval (in milliseconds). |
jcontrol.ui.vole.AnimationContainer
Besides the additional functions for animated Gui components, the AnimationContainer behaves just like a usual Container. Animateable GUI components like the FanMeter may also be added to a Container, it won't be animated though. Components that are not animateable can likewise be added to an AnimationContainer.
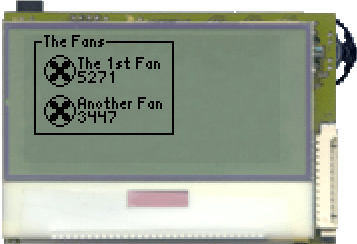
Open the VoleFanMeterExample in your JControl/IDE and start the simulator. You will be presented with an image similarly to the one shown in figure 6, except that the fans are spinning.
| 1 | import jcontrol.lang.Math; |
| 2 | import jcontrol.lang.ThreadExt; |
| 3 | import jcontrol.ui.vole.AnimationContainer; |
| 4 | import jcontrol.ui.vole.Border; |
| 5 | import jcontrol.ui.vole.Frame; |
| 6 | import jcontrol.ui.vole.meter.FanMeter; |
| 7 | |
| 8 | /** |
| 9 | * <p>This example demonstrates how to use the |
| 10 | * component FanMeter within the GUI framework |
| 11 | * JControl/Vole.</p> |
| 12 | * |
| 13 | * <p>(C) DOMOLOGIC Home Automation GmbH 2003-2005</p> |
| 14 | */ |
| 15 | public class VoleFanMeterExample extends Frame { |
| 16 | |
| 17 | /** |
| 18 | * Create an animateable Fan and add it to an AnimationContainer |
| 19 | */ |
| 20 | public VoleFanMeterExample() { |
| 21 | // create two Fans |
| 22 | FanMeter fan1 = new FanMeter(10, 10); |
| 23 | fan1.setCaption("The 1st Fan"); |
| 24 | fan1.setNumericDisplay(5,0,"RPM"); |
| 25 | FanMeter fan2 = new FanMeter(10, 30); |
| 26 | fan2.setCaption("Another Fan"); |
| 27 | fan2.setNumericDisplay(5,0,"RPM"); |
| 28 | |
| 29 | // create a Border around them |
| 30 | this.add(new Border("The Fans", 5, 0, 70, 50)); |
| 31 | |
| 32 | // create an AnimationContainer and add the Fans |
| 33 | AnimationContainer ac = new AnimationContainer(); |
| 34 | ac.add(fan1); |
| 35 | ac.add(fan2); |
| 36 | |
| 37 | // add the AnimationContainer to the Frame |
| 38 | this.add(ac); |
| 39 | show(); |
| 40 | |
| 41 | // create some random values |
| 42 | for (;;) { |
| 43 | fan1.setValue(4800+Math.rnd(500)); |
| 44 | fan2.setValue(3400+Math.rnd(200)); |
| 45 | try { |
| 46 | ThreadExt.sleep(1000); |
| 47 | } catch (InterruptedException e) {} |
| 48 | } |
| 49 | } |
| 50 | |
| 51 | /** |
| 52 | * Instantiate the VoleFanExample |
| 53 | */ |
| 54 | public static void main(String[] args) { |
| 55 | new VoleFanMeterExample(); |
| 56 | } |
| 57 | } |