GUI programming using JControl/Vole
IV. EventHandling
The GUI framework JControl/Vole provides mechanisms for an message based handling of events that are used by all interactive components. Programmers of JControl/Vole based applications just have to implement an ActionListener to be albe to react to user inputs. How to install an ActionListener onto a specific GUI component and process its ActionEvents, will be shown in the following sections.
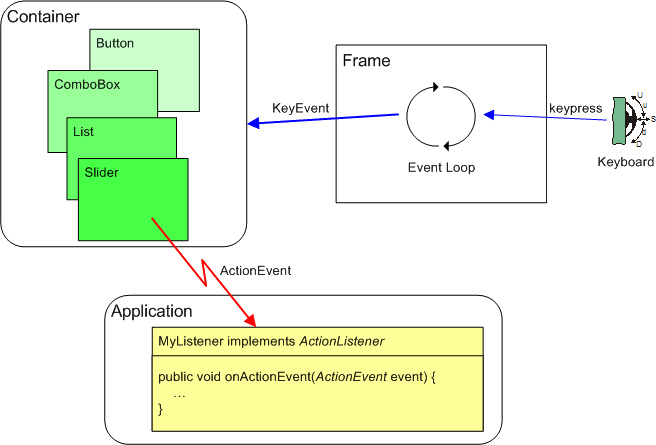
Figure 1 outlines the principle of the transmission of messages by JControl/Vole: An event loop, which runs as a background thread, is automatically installed by the class Frame. This loop continuously queries the keyboard and triggers a KeyEvent if a key is pressed. The KeyEvent is transmitted to the user interfaces' Container framework, that now has to determine which GUI component has to be related to the KeyEvent. Finally, the event reaches the very GUI component that currently owns the input focus and will there be transformed into an ActionEvent.
An ActionEvent can only be triggered, if the application program installed an ActionListener onto the GUI component (by invoking {component}.setActionListener(ActionListener listener)). In that case, the method onActionEvent(ActionEvent event) of the according ActionListener will be invoked and the application program is able to react to messages from this GUI component.
Example
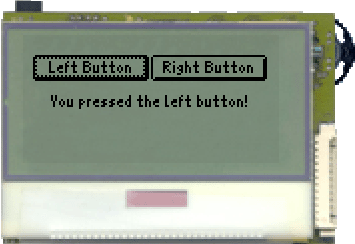
A program example shall demonstrate the handling of ActionEvents. Two Buttons and a Label are created. An ActionListener is installed onto both Buttons, that ought to react to their activation by the user in form of altering the Labels' content.
| 1 | import jcontrol.ui.vole.Button; |
| 2 | import jcontrol.ui.vole.Frame; |
| 3 | import jcontrol.ui.vole.Label; |
| 4 | import jcontrol.ui.vole.event.ActionEvent; |
| 5 | import jcontrol.ui.vole.event.ActionListener; |
| 6 | |
| 7 | /** |
| 8 | * <p>This example demonstrates how to handle |
| 9 | * events within the GUI framework JControl/Vole. |
| 10 | * This program needs the image resource |
| 11 | * 'mouse.jcif'.</p> |
| 12 | * |
| 13 | * <p>(C) DOMOLOGIC Home Automation GmbH 2003-2005</p> |
| 14 | */ |
| 15 | public class VoleEventHandlingExample |
| 16 | extends Frame implements ActionListener { |
| 17 | // the Label |
| 18 | Label label; |
| 19 | // the right Button |
| 20 | Button button_right; |
| 21 | |
| 22 | /** |
| 23 | * Create two buttons and a label and add an ActionListener. |
| 24 | */ |
| 25 | public VoleEventHandlingExample() { |
| 26 | // create the Buttons |
| 27 | Button b1 = new Button("Left Button", 2, 10, 60, 13); |
| 28 | button_right = new Button("Right Button", 66, 10, 60, 13); |
| 29 | |
| 30 | // add the ActionListener |
| 31 | b1.setActionListener(this); |
| 32 | button_right.setActionListener(this); |
| 33 | |
| 34 | // add the Buttons to the Frame |
| 35 | this.add(b1); |
| 36 | this.add(button_right); |
| 37 | |
| 38 | // create the Label |
| 39 | label = new Label("Please press a button!", 0, 30, 128, 10, |
| 40 | Label.ALIGN_CENTER); |
| 41 | this.add(label); |
| 42 | } |
| 43 | |
| 44 | |
| 45 | /** |
| 46 | * This is the event handler. When a component fires an |
| 47 | * ActionEvent for us, this method is invoked. |
| 48 | */ |
| 49 | public void onActionEvent(ActionEvent event) { |
| 50 | // check whether this is a BUTTON_PRESSED event |
| 51 | if (event.getType() == ActionEvent.BUTTON_PRESSED) { |
| 52 | |
| 53 | // recognize event's source by using getActionCommand() |
| 54 | if (event.getActionCommand().equals("Left Button")) |
| 55 | label.setLabel("You pressed the left button!", true); |
| 56 | |
| 57 | // recognize event's source by using getSource() |
| 58 | if (event.getSource() == button_right) |
| 59 | label.setLabel("The right button was hit!", true); |
| 60 | } |
| 61 | } |
| 62 | |
| 63 | |
| 64 | /** |
| 65 | * Instantiate and show the main frame. |
| 66 | */ |
| 67 | public static void main(String[] args) { |
| 68 | new VoleEventHandlingExample().show(); |
| 69 | } |
| 70 | } |
Installing ActionListeners
The ActionListener instance to receive ActionEvents in the program example of the previous section is the class VoleEventHandlingExample itself. This is defined during the class declaration by the argument "implements ActionListener". To satisfy the requirements of an ActionListener instance, the method onActionEvent(ActionEvent event) has to be implemented. The following sections were taken from the source code listing and show the relevant segments for successfully installing an ActionListener.
| ... | |
| 15 public class VoleEventHandlingExample | |
| 16 extends Frame implements ActionListener { | |
| ... | |
| 30 // add the ActionListener | |
| 31 b1.setActionListener(this); | |
| 32 button_right.setActionListener(this); | |
| ... | |
| 49 public void onActionEvent(ActionEvent event) { | |
| ... |
For onActionEvents to be triggerd by both Buttons, we pass a pointer to the class instance by using Button.setActionListener(this) and therewith register the ActionListener. A pointer to any other class that implements the interface ActionListener will be acceptable as well.
Processing ActionEvents
The class ActionEvent provides three methods to process received messages: getType(), getActionCommand() and getSource().
-
int getType(): This method returns the type of theActionEventas anint. Table 1 lists the possible returned values:
| Return Value | Description |
|---|---|
BUTTON_PRESSED | The message has been triggered by a Button. |
ITEM_SELECTED | An item of a List or ComboBox has been selected. |
VALUE_CHANGED | A numerical value has been changed (e.g. of a Slider). |
STATE_CHANGED | The state of a RadioButtons or CheckBox has been changed. |
jcontrol.ui.vole.event.ActionEvent.getType()
-
String getActionCommand(): Using theActionCommand, GUI components are able to add information to anActionEvent. The receiver can extract this information by invoking the methodgetActionCommand(). The kind of information depends on the component.Buttons, for example, will transmit their labels. Notice that theActionCommandmay also benull.
-
Component getSource(): With help of the methodgetSource(), the source of anActionEventcan be determined. The return value represents a pointer to the appropriateComponent.
In the following excerpt of the example program are two techniques demonstrated of how to determine the source of an ActionEvents. At first, the method onActionEvent checks if the received event has been triggered by a Button (event.getType()). Thereafter shall be decided if the left or right Button has been pressed. The left Button is hereby identified by the methode event.getActionCommand and the Button's label. The right Button is identified by using event.getSource(). The last method may seem more elegant, but assumes the presence of a pointer to the Button as a variable of the class instance. This may not be the case, if the ActionListener is implemented by a separate class.
| ... | |
| 49 public void onActionEvent(ActionEvent event) { | |
| 50 // check whether this is a BUTTON_PRESSED event | |
| 51 if (event.getType() == ActionEvent.BUTTON_PRESSED) { | |
| 52 | |
| 53 // recognize event's source by using getActionCommand() | |
| 54 if (event.getActionCommand().equals("Left Button")) | |
| 55 label.setLabel("You pressed the left button!", true); | |
| 56 | |
| 57 // recognize event's source by using getSource() | |
| 58 if (event.getSource() == button_right) | |
| 59 label.setLabel("The right button was hit!", true); | |
| 60 } | |
| 61 } | |
| ... |
The kinds of ActionEvents that are generated by the components of JControl/Vole are described in the according API documentation. Indeed, all components provide the method setActionListener(ActionListener listener). That way, an application program may individually process the user triggered events and define, which events it will react to and which events will be ignored.
For more examples of how to process messages of GUI components, see the extensive documented program examples in section Examples & Demos http://www.jcontrol.org/examples/index_en.html.